
Getting started generating free solar power is really not as hard as it seems. In the last 5 years, I have learned the key concepts of building a low-cost off grid solar system. Now I’ve written everything down right here. Just everything you need to know without the fluff.
This is part 3 of a 3 part series:
- Part 1 — Overview, Designing Your System, Choosing the Right Site
- Part 2 — Choosing the Correct Components
- Part 3 — Solar Energy Installation
Building Your Battery House, Solar Shed, or Solar Closet
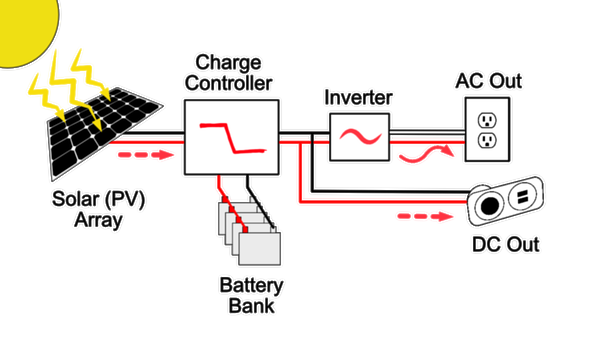
Now that you have ordered all the right parts, it’s time to start building and installing your solar system. The first step along the way should be to set up your main solar utility room, which will house batteries and the controlling electronics (charge controller, inverter, and BMS if any) for your off grid solar system.
This room can be a separate shed, a closet in your home, or even a compartment in your RV or camper.
Ideally, it should be somewhere between the location of your solar panels and the main usage points in your home. If you are using an MPPT charge controller and are setting up your panels to have a higher voltage than the battery bank (usually a good idea), then the battery house should be as close to the home as possible to save costs on copper wire, since the higher voltage segment running to the panels is cheaper than the lower voltage connection to the battery, inverter, and DC load.
Do solar battery banks need to be heated?
Lead acid (SLA and FLA) batteries do not necessarily need to be heated, and can tolerate freezing temperatures. However, batteries that are allowed to get very cold may not run as efficiently, and benefit from a charge controller that is capable of temperature compensation, which will increase the battery bank’s lifespan.
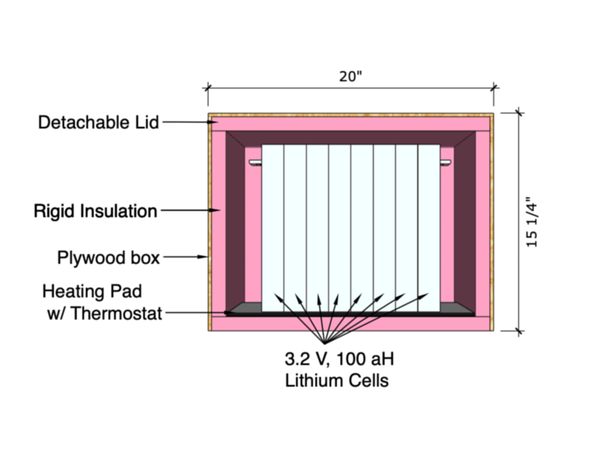
Lithium batteries must never be used in freezing temperatures, and should either be heated, or fitted with a charge controller capable of low temperature cutoff. The cheapest option is to build an insulated box to house your batteries, and surround them with this heating pad with thermostat which will kick in automatically and keep the batteries up to temperature. This should be connected through the charge controller or a low voltage disconnect, so that if the batteries run low the heater pad will turn off as well.
Nickel Iron batteries can operate in low temperatures, but may benefit from a little extra heat as well.
Do you need to vent your battery compartment?
Open batteries such as flooded lead acid (FLA) batteries or nickel iron (NiFe) batteries naturally produce hydrogen gas, and must be vented. Sealed batteries such as sealed lead acid (SLA) batteries or lithium batteries do not produce gas and do not need to be vented.
Hydrogen gas produced by open batteries is potentially explosive, and cannot be allow to accumulate in a closed space over time
Venting can be as simple as a pipe in the high point of your battery room or battery box leading outside, and a small vent near the floor to allow air flow. Hydrogen naturally rises and tends to disperse quickly when given the opportunity.
Installing Your Solar Panels and Support Structure
Solar panels need to be pointed in the proper direction and well supported in order to make sure they are efficient and last a long time. For increased power production, you also have the option of manual or automatic tracking, which can almost double your power output.
Which Direction to Install your Solar panels
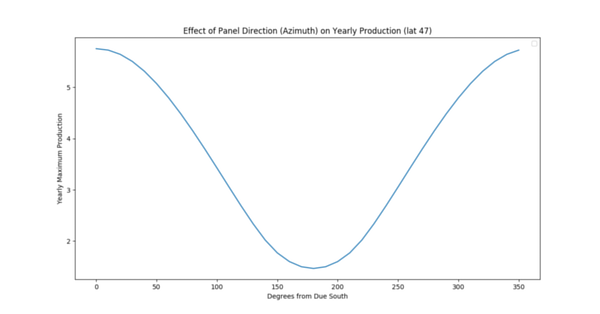
Solar panels are much more efficient when they are facing due south (or north in the southern hemisphere) and tilted to the proper solar angle. Installation on roofs that do not face directly south is not recommended. Check out my optimum solar panel tilt article for more details.
 ### How Much to Tilt Your Solar Panels
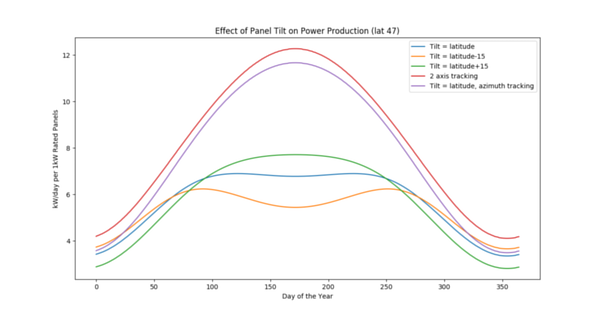
If you are going to tilt your solar panels to a fixed angle (no tracking) then tilting them to the same angle as your as your latitude maximizes yearly output. So, if you on the equator, have them pointing straight up, while as far north as Seattle you should tilt them down 47 degrees. Here is a list of the optimum tilt angle by zip code.
However, if you need more production in the winter or summer, then tilting them down by 15 degrees or up by 15 degrees will significantly increase there output that time of year while reducing other times of the year.
Solar Panel Tracking
Facing your solar panels directly at the Sun, at all times of the day, will always get the most possible power, but can be difficult to accomplish. While full tracking setups (2-axis tracking) solar panel mounts exist, they can be expensive and are often not worth the extra investment over 1-axis or fixed mounting options. Usually it is cheaper to just add a few extra panels than build a complex movable mounting system.
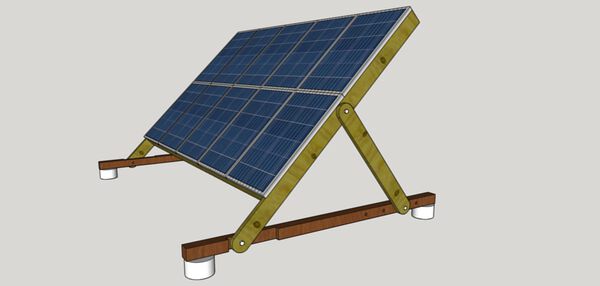
One good alternative to a motorized solar panel tracking system is a manual tilt adjustment. Manually setting the tilt 4 times a year, once for each season, can increase panel productivity by 40%, and helps to even out power production between summer and winter.
A simple A-frame design, such as the one shown above, can be built in a day and can be sides to fit your particular design. The image above shows a 1 kW array. Bolts act as hinges, and several mounting holes on the bottom allow the panels to be tilted by +15 degrees in the summer and -15 degrees in the winter.
Solar Panel Ventilation and Cooling
Another important consideration when installing solar panels is to allow for ventilation on the back side of the panel. Panels tend to get very hot in the sun, but when they get around 100 F, the panel power output tends to decrease, as does the lifetime. The remedy to this problem is to allow for plenty of air flow on the back side of the panel.
The design shown above allows for the back of every panel to be completely exposed to nearly unobstructed air flow, which is one of it’s strengths vs a on-roof rack.
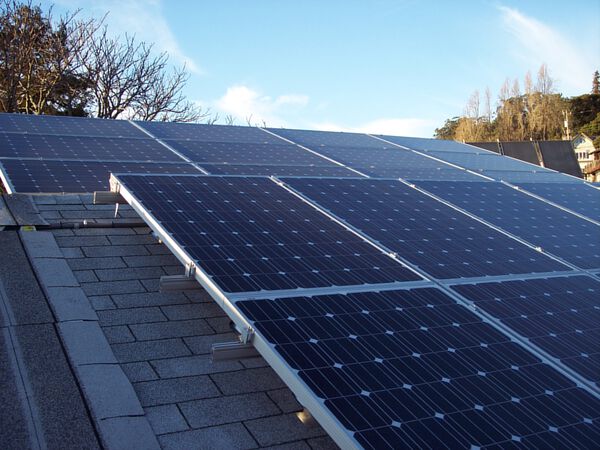
If you do decide to roof mount your solar panel, make sure to raise them 6" – 8" above the shingles / roofing using appropriate hardware. Additionally, building with lighter colored shingles or reflective roofing can help to reduce the temperature in the vicinity of the solar panels, and thus prolong their life.
Wiring Up Your Off Grid Solar System
With your solar panels installed and battery bank in place, it is time to wire up your off grid solar system. Finally, everything is coming together.
Remember, that will most low voltage solar systems are relatively safe, it is your responsibility to ensure proper care is taken, and common sense followed, as all electricity is potentially hazardous. Likewise, 120 V AC systems after the inverter are potentially fatal.
Installing a “grid connected” system, ie attaching to existing wires that are powered by utilities, should never be done on your own. You will need to contact an electrician, and probably your utility company as well, in order to safely complete such an installation project.
Wiring the Solar Panels, in Series or Parallel?
The first thing to know is whether you are going to be wiring your panels in series (plus to minus), parallel (all pluses together, all minuses together), or some combination of the two.
By now you should have some idea of your desired solar array voltage, and should know the maximum voltage supported by your charge controller, as well as the rated voltage of you panels. This should be listed as the open-circuit voltage of each panel.
Wiring Solar Panels in Series
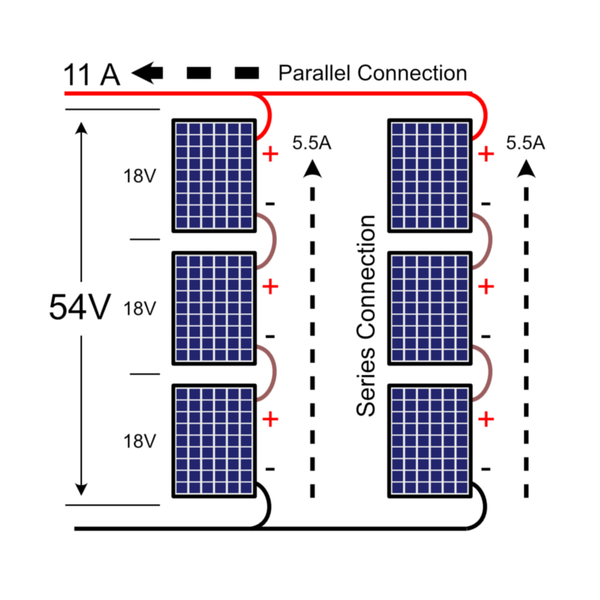
Generally, I prefer to wire my panels in series as much as possible, as this saves on wire cost. In this case, every panel you wire on the chain adds their voltage to the total, so three 18V panels in series would become a 54 V array. This total must be less than the max input voltage of your charge controller, otherwise you risk blowing it out.
Remember, the solar array voltage should only exceed the battery bank voltage if you have a MPPT charge controller, otherwise solar panel voltage should be kept slightly above the battery voltage.
If you are going with a lower cost model of charge controller, it is also a good idea to leave ~10V of extra head room between your array voltage and the charge controller maximum, as they tend to burn out easy. More expensive name brand controllers usually include a bit of head room over the listed rating already, so it isn’t as crucial in that case, but leaving a bit extra room never hurts.
Wiring Solar Panels in Parallel
If you are going with a PWM, and a smaller system then wiring is parallel might be the only option. Also, in situations with unavoidable partial shading wiring in parallel will probably give you better performance.
Where as series wiring increased the array voltage, wiring in parallel adds up array current. This means where a single 18V, 100W panel would produce around 5.5 amps of current max, wiring 2 solar panels in parallel would increase the current to 11 amps.
Wiring Solar Panels Both Series and Parallel
For larger systems, such as full house replacement or off grid cabin systems, you may have too many panels to wire all of the panels in series without exceeding your charge controller’s input voltage. Yet, you want to save money over the more expensive parallel wiring option. In this case the best solution is a combination of the two.
This arrangement is shown in the diagram above. First, the panels are wired in to series strings, long enough to produce the desired array voltage. Then the strings are wired in parallel. Every string of series panels need to be the same voltage, and thus will usually have the same number of panels.
Can I mix different types of solar panels?
It is usually a bad idea to mix different ages or types of solar panels. One bad panel in a string of series connected panels can ruin the output of all the others. Additionally, different brands of panels may have different maximum power points, which would reduce the effectiveness of your MPPT charge controller, by lowering the aggregate maximum power point.
The only time you might consider mixing different panels in the same array would be if they are only parallel connected, and you are using a PWM charge controller.
If you decide to add more panel later, or want to use different types of panels, the best way to connect them is to wire them as separate arrays with separate charge controllers. It is OK to have multiple charge controllers hooked to the same battery bank, so long as they have the same battery charge profile. This is easiest to accomplish by using multiple of the same model and brand of charge controller. Having more than one charge controller also gives you a bit of redundancy in your off grid solar system, so that if one of them goes out, you will still have some power to get you by while you fix the broken one.
Grounding
Any exposed aluminum or other metal parts of the your solar array should be grounded for safety. This can be accomplished by bolting a copper cable to each isolated metal frame, and running those wires together to where they are bolted to a grounding rod.
Check your local building codes or a knowledgeable electrician to determine how deep of a grounding rod you need in your area to be safe.
Running Wires From the Solar Panels to the Battery Compartment
As mentioned in the previous article in this series, most electrical wire will not last given prolonged exposure to the sun. When running your external wires, you need to be aware if your wires are rated for solar exposure (solar / PV wire) or not.
Non-solar wire should be painted or run through a conduit to protect it from the Sun.
Use properly sized wire guides or clamps to keep wire runs from moving. At no point should solar power wires run in an exposed area where they can be accidentally broken or intentionally tampered with by animal or children.
For solar arrays away from the home, direct bury wire is one good option, but make sure you wire is rated for it. Buried conduit is also a good idea, in that it gives you a way to replace the wire or run more wire without having to dig the old wire up. You can just pull it through the conduit.
Wiring Up Your Battery Bank
Wiring up your battery bank, if you are using multiple batteries, again comes down to the concept of series or parallel. Series connections increase the voltage, while parallel connections increase the current (amps).
Batteries, Series vs Parallel
Your battery bank voltage should almost always be the same as your DC circuit voltage, either 12 V, 24 V, or rarely 48 V. If do not plan on running any DC appliances, then it should be as high as feasible without exceeding the input voltage of your AC inverter.
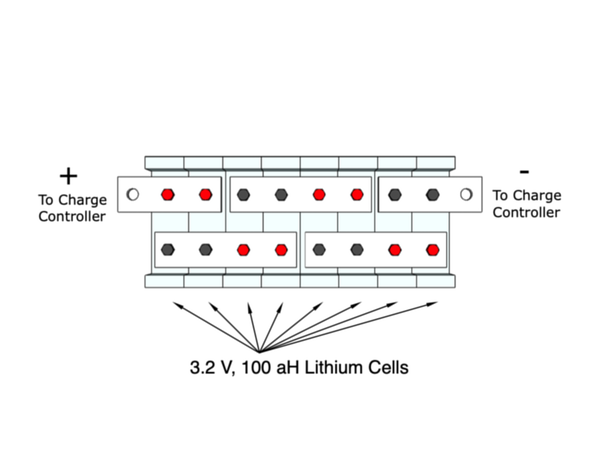
The above diagram shows an example battery setup where 3.2 V cells are wired for a 12 V system, with two strings in parallel. When wiring batteries, it usually works out better to hook them in groups of parellel batteries first, then joint those groups in series, rather than in series strings like shown above for solar panels. Electrically, it all works out the same, but this way of thinking makes wiring easier and more compact.
Just like with mixed series, parallel connections on solar panels, every string of series connected batteries must have the same voltage, and thus the same number of identical batteries. For example, in the above diagram 4 batteries are run in parallel, at 3.2 V each, to reach 12+ V total. Because of this, if I wanted to add more batteries later, I would need to add them 4 at a time. I could never have 10 batteries, say, or 6 batteries, because they are not a multiple of 4.
Battery Balancing
During normal operation, it is possible for the different batteries, which are series connected, to soak up power unevenly, and thus come to be at different levels of charge. This may be a problem because charge controllers only work off the total bank voltage. And, if one battery is much lower voltage than the rest, it may damage itself by over-discharging even while everything seems OK to the charge controller.
While the low charge rates of solar systems tend not to see battery balance become as much as an issue, compared to things like electric cars, it is worth considering.
With new batteries banks, or when adding new batteries to an existing bank, it is good idea to manually level the bank. You can do this by:
- Fully discharge the batteries to the safe discharge point
- Disconnect the battery bank from the solar system
- Connect all the batteries in parallel, and let them sit for 24 hours
- Reconnect the system in series as needed
It is good practice to check the voltages of your batteries with a multimeter every so often to make sure the batteries have maintain their balance over time. When they show different voltages, tak the time to preform a manual battery balancing again, as above.
Battery Management Systems (BMS)
When using lithium batteries that you connect in series yourself, it is essential not only to do a manual leveling, but to also install a BMS for battery bank. Because lithium batteries fail catastrophically when they go under voltage, leaving the battery leveling up to occasional maintenance is not a good idea.
The purpose of BMS is to constantly monitor the voltage of each battery bank. Some BMSs are self-leveling, where they will siphon power from over filled batteries and provide extra power to under filled batteries. Others serve only as a morning and emergency disconnect that will disable the bank if any battery gets too far out of limits. Once disabled, you would need to manually level the bank, as before.
Most lead acid replacements, or higher voltage lithium batteries sold as a single bank, will have internal BMSs built in to the bank. However, if you are series connecting individual lithium cells or lithium battery banks, you will also need to provide a BMS of your own.
The BMS you choose must have the proper voltage ratings. Each one will come with a number of wire connections. In order to install, you must connect the ground connection (black) to the battery bank ground, then connect one of the battery wires to the positive terminal of each set of parallel connected lithium battery cells.
Depending on the type of BMS, you may also wire the battery bank output through the BMS as well, so it can serve as an emergency disconnect. In this case be sure your BMS is rated to handle the current produced by your system.
Wiring Your Solar Charge Controller
Setting up your solar charge controller is probably one of the most rewarding parts of your off grid solar build.
Wiring Up Safety Disconnects / Switches
For this part, I recommend you cover up your solar panels with thick sheets, blankets, or tarps to ensue they are not producing any power. Also, I recommend working with discharged batteries if possible. In any case, be very careful to not touch any electrical connections and use proper safety precautions.
First, I recommend you install a circuit breaker / switch on to the positive lead of the solar panels, battery bank, and have one ready on the load side. This offer added protection and allows you to disconnect any part of the system if you need for safety and maintenance
I personally like this circuit breaker switch combo which comes in a wide range of amp ratings and is rated up to 72 V. Don’t cheap out on this part of the system.
Connecting the Charge Controller
Once you have the switches installed, you are ready to hook up the charge controller to power.
Most charge controllers have labeled + and - terminals for your power source (solar array), battery bank, and may have terminals for your load as well. Connect the positive of your solar array to the positive and negative to the negative. Likewise for the battery bank.
Now, you can remove the covers from you cells, and turn on the switches. A this point your charge controller may come to life and start charging the batteries.
Choosing the Correct Charge Profile
Most charge controllers come with a number of charge profile depending on chemistry of your batteries, lead, lithium, etc. Take time to read the manual for your charge controller and make the proper selection. Your battery manufacturer may also have specific recommendations for their particular product that you may input at this time
Temperature Compensated Charge Controller Setup
Your charge controller may have temperature compensation, which is a feature that adjusts the charge profile of your battery bank depending on the temperature, for maximum life of the battery bank. It may also be able to cut off power from the batteries if they go below a certain temperature that would damage the batteries.
If your charge controller does have temperature compensation, it should have extra terminal or a plug labeled “temp” or something similar. In that case your controller should have come with an extra wire that is the thermometer, which plugs in to that spot.
Thermometers from different manufactures are not necessarily interchangeable, so you need to make sure you use the thermometer provided by your manufacturer.
Run the thermometer in to the battery bank, and tape it as close to the batteries as possible. While being run, batteries warm themselves up, so having the measuring point any distance away could give the controller a completely wrong reading, making it work very poorly in some cases.
How to wire up more than one charge controller on one battery bank
If you have multiple charge controllers, you can wire each on to a separate solar array, or even wind or micro hydro if you desire. Make sure they both have the same exact settings regarding charge profile, otherwise one may cut off before the other.
Wire them to the same battery bank in parallel, positive to positive on all the controllers, and negative to negative.
If your controllers have load connections, you may connect those in parallel as well.
Wiring Off Grid Solar Inverters and DC Loads
By now in the process, you should have power being generated and batteries charging. Now it’s time to use it.
Low Voltage Disconnect
If your charge controller doesn’t have a load connection, or you want to draw more current from your batteries than your charge controller can support, then you will need a low voltage disconnect. This device monitors battery voltage, and cuts them off if they get so low as to damage them.
This low voltage battery is a great choice for systems up to 20 A and 12 V or 24 V.
Wire the disconnect in between the battery bank and your fuse box, connecting ground to -, battery to your battery bank +, and the load to your fuse box +.
DC Power Circuits and Fuse Box
For larger systems — cabin, whole house and larger RVs — where you are powering many different items, it is a good idea to add a fuse box to your system. This allows you to cut power to specific circuits when necessary, and increases the safety factor for high current systems. I would recommend a fuse box for any system that can produce more than 20 A.
Automotive / RV / marine fuse boxes work great, and allow you to choose fuse rating to meet your specific need. I try to keep each circuit less than 20 A if possible, and separated them by type or room. So lights on one circuit, refrigerator on another, kitchen sockets on a third, etc.
Use the appliance power measurements you made in part 1, and group them by circuit. Add up all the currents (or divide the power in watts by the circuit voltage) to sum up the maximum possible draw on that circuit. Choose a fuse for that circuit a few amps above the maximum rating, or the nearest fuse that exceeds your estimate.
Wire the fuse box by connecting the load + to the box common lead, usually at the top or bottom center. Then, label each fuse socket and connect each socket’s terminal to the + of your various appliances, lights, etc. Connect all circuit’s - lead to the load -. Finally, insert properly rated fuses for each circuit.
Inverter Wiring
If you are going with an AC only system, then the inverter will be your only load. In that case don’t worry about the fuse box and just wire your inverter directly to the load sockets on your charge controller or low voltage disconnect.
Otherwise, if you are using a mixed DC / AC system, give the inverter it’s own DC circuit with a fuse rated the same as the inverters maximum input current.
On the AC side of the system, wiring is the same as traditional home wiring. For a small inverter, you might just wire it directly to a wall socket. Larger inverts that provide over 20 A of AC current would benefit from connecting a traditional circuit breaker box with usual AC circuit and breakers.
12 V and 24 V Power Connectors
DC power systems have a variety of options when it comes to power plugs. Unlike AC power sockets, which are very standard, DC appliances may or may not come connectors on their plugs. You may have to attach your own plug to the wires provided, if you don’t want a permanent install.
The following connectors are industry standard, and are available as separate plugs and sockets for use in your DC power install.
Another very common DC power connector is the every present USB connector used by phones and smart devices. 12 V / 24 V to USB converters are widely available.
Conclusion
This has been your in depth guide to DIY solar power and energy independence. We have gone through every step of the, including solar system design and sizing, choosing proper components, and installation of solar arrays, battery banks, and control electronics.
My dearest hope is that you are able to use this information to build a better life for you and your family. And, gain a bit of freedom that you didn’t have before.
Best wishes.
← Go back to Part 2 — Choosing Components
Related Questions
What is the function of a solar charge controller?
Primarily solar charge controllers prevent solar panels from over charging the battery bank. MPPT charge controllers also adjust solar panel loading to improve efficiency. Some charge controllers also track energy usage, and provide safety cutoffs.
How long do solar panels last?
Solar panels degrade slowly over time, at about 1% per year. Typically, panels are expected to operate for 20+ years before being replaced, although they are usually functional at the time of replacement.