
Getting started generating free solar power is really not as hard as it seems. In the last 5 years, I have learned the key concepts of building a low-cost off grid solar system. Now I’ve written everything down right here. Just everything you need to know without the fluff.
This is part 2 of a 3 part series:
- Part 1 — Overview, Designing Your System, Choosing the Right Site
- Part 2 — Choosing the Correct Components
- Part 3 — Solar Energy Installation
Choosing Solar Panel Components
By now you should know how many kilowatts a panels do you need, how big of a battery bank you would want, and how much power you use on a typical day. (If not, check out the previous article in this series which walks you through the process). With this information will be able to choose and purchase your solar system.
Well there are many false older kids on the market, I haven’t found that buying these kids really save you much money. Likewise, if you go for an inexpensive cat you’re going to get inexpensive components. For an off grid system I don’t recommend skipping out on the key components of your system, as any unexpected failure could be costly and very inconvenient.
Choosing good come on is from a reputable supplier gives you the option of expanding your system at any time, piece by piece. If you find that your system doesn’t produce and a power, or you find out your needs increase, instead of replacing the whole system you could just buy a second charge controller and set a panels and wire that into the original system. And, if your AC power needs increase you could simply add on another inverter. Doing such a modular upgrade, also comes with a benefit that you have back ups built into your system. So if one to charge controller or inverter fails you still have the other to fall back on are you were replacing the original.
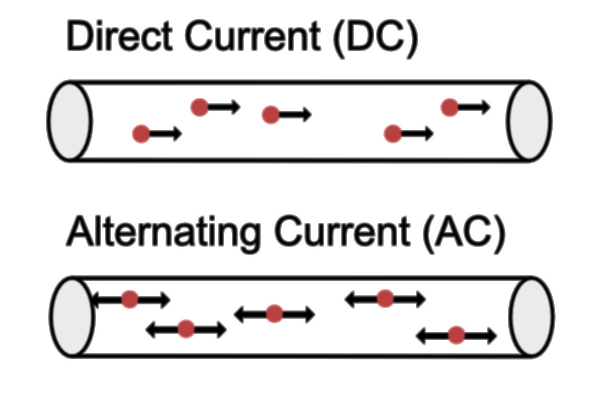
AC vs DC
I’ll electrical power comes in one of two forms, alternating current or direct current. Solar panels, batteries, LEDs, electronics, USB devices, and many other appliances are naturally DC. However, the plugs in your walls are AC. The whole grid runs off AC power, which means that the many DC devices in your home must convert the AC wall power into appropriate DC power. This process is inherently in efficient, and because your solar system is also natively DC you will be wasting power into ways: covering your batteries to AC, then converting the AC back to DC.
When investing in an offer and power system, it makes sense to consider how much of your home you could actually run of DC. In many cases, it is cheaper to buy a few DC need of appliances, or to take the time to convert your AC appliances to DC, then it is to buy more solar panels and larger can charge controller’s.
There are many 12 V or 24 V appliances, lights, and other gadgets on the market for use in RVs. And I had a benefit of going with DC appliances, is that they are generally more efficient since they are meant to be run from battery.
Before we decide on the other components, it is good to take stock and determine how many of your appliances can run up to DC, and how many need to run up AC, if any. We will also need to determine whether we want to go with 12 V or 24 V DC appliances. It takes thinner wire to run 24 V power and is usually cheaper, but there seems to be more 12 all appliances on the market, so you need to choose which voltage you want to go with before we move on to the next step.
Choosing the Right Charge Controller
Charge controllers are the heart of your solar power system. Their main job is to protect the batteries from being overcharged by solar panels on sunny days, and most also have under voltage protection for the battery so that they do not get run solo that there ultimately damaged. Most charge controllers also have the capability of measuring how much power as being generated by the panels and how much power is being used, and they usually have a way of displaying the data.
PWM vs MPPT Charge Controllers
There are two main types of charge divorce on the market — PWM and MPPT.
PWM charge controller are cheaper, but also much less capable. With these types of charge controller’s, the voltage of the solar array must be the same as the battery bank. If the solar panels are below the battery voltage, they cannot charge the batteries. If the solar panels or above the battery voltage, then any additional Power that they produce is wasted, ultimately being down regulated by the charge controller. I only recommend PWM charge controller’s for a small systems under about 1 kW.
On the other hand, MPPT charge controllers are capable of transforming the solar array voltage down to the battery bank voltage, which means you can run your solar panels at a higher voltage. This can save you money on wire running between the solar panels and the battery house, which can be a major expense. This capability also allows MPPT charge controllers to perform what is called maximum power point tracking, which can increase the overall efficiency of your solar panels.

What Size Charge Controller to Use
Charge controllers are rated based on their maximum input voltage, their maximum output voltage, and then maximum current that they can source. Choose an output voltage at least as large as your battery bank voltage. The input voltage depends on what voltage you want to run your panels at. Again, higher panel voltages save you money on wiring, but more susceptible to power loss due to shading. The current rating limit how much power they charge controller can produce at a given battery bank voltage. Multiply the maximum current buyer battery bank voltage to determine how much power they charge controller can produce, and make sure an exceeds the power rating of your solar panel array in watts.
Temperature Compensation
More advanced charge controllers, meant for cabin size or whole house systems, also have a battery temperature compensation feature. This allows th computer brain of the charge controller to adjust the battery charging profile based on the battery temperature, which can make your batteries last much longer, and may be an essential safety feature for some types of batteries.
In general, I highly recommend selecting a charge controller that does have temperature compensation, as extending battery life is almost always worth the extra cost in the long run. Make sure that the charge controller you select supports the type of battery choose to run — sealed lead acid, flooded lead acid, lithium, or other. Some controllers also let you set your own charging curves, which would be necessary for more unusual batteries such as the highly durable iron Edison battery I talk about below.
Multiple Charge Controllers
It is possible to run multiple charge controllers on the same battery bank. This allows you to size up your system in steps and provide redundancy to your system.
Additionally, when using MPPT charge controllers, you may increase the overall efficiency of your panel arrays, by allowing the power point matching to more accurately match panels of different ages or shading conditions.
When using more than one controllers on the same bank, it is essential that you make sure they are running the same charging profile. The easy way to do this is to use charge controllers of the same brand and model, and then set their profile setting to be exactly the same.
Choosing Your Battery Bank
The battery bank is one of the most expensive components of your solar system, and is one of the most important factors when considering usability of off grid systems. Unlike grid connected solar power, off grid systems have no external backup, and must store all their own power for times when the panels aren’t producing.
| Battery Type | Cost (Usable kWh) | Upfront Cost | Lifetime |
|---|---|---|---|
| Sealed Lead Acid | $388/kWh/1k cycles | $388/kWh | 1000 cycles |
| Flooded Lead Acid | $240/kWh/1k cycles | $240/kWh | 1000 cycles |
| LiFePO4 | $150–$250/kWh/1k cycles | $750/kWh | 3000–5000 cycles |
| Edison NiFe | <$10 (can last decades) | $900/kWh | 10k+ |
What Type of Battery for Off Grid Systems?
Lead acid batteries are the most common type of battery available and are initially the cheapest to install. These are similar to the common car battery, but it is usually much less expensive to buy purpose built deep cycle lead batteries which are designed for maximum power storage. Lead batteries should never be discharged below 50% of their max capacity, which means you need divide the capacity the battery manufacturer advertises by half when running calculations.
Lead acid batteries come in two types, sealed (SLA) and flooded (FLA). The big difference is that sealed lead acid batteries don’t off gas hydrogen, and they don’t need additional water, but they are much more expensive. Flooded lead acid batteries do need some care over time to make sure their water level is correct, and their batteries houses need to include a way to vent hydrogen and prevent explosive build up.
Lithium batteries come in a various types, and are what you typically find in phones and laptops. Tesla power walls and most electric vehicles also use lithium. Lithium batteries are much more expensive up front than any of the lead batteries, but they have a much longer lifespan and can accommodate a full 80% depth of discharge (although the less you discharge the better). Because lithium last longer than lead, lithium is the lower cost option in the long run.
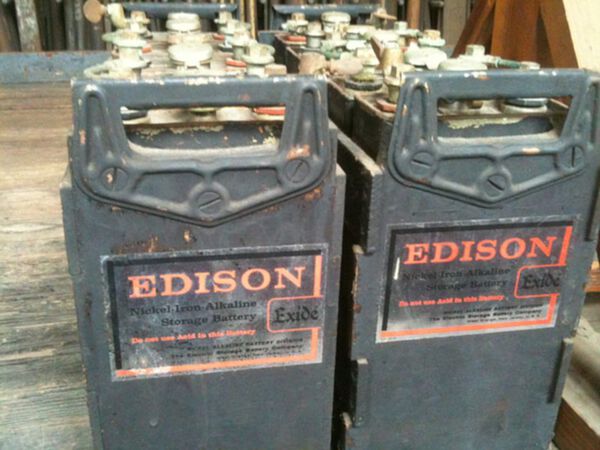
Edison nickle iron batteries are a growing tread in off grid power, making a come back after their first introduction to the US by Thomas Edison around the turn of the last century. These batteries are extremely robust and long lasting, and can support a nearly full depth of discharge. They do need occasional maintenance and produce hydrogen, like flooded lead acid batteries.
Right now, because there are few producers on the market, nickle iron batteries have the highest initial cost, but are said to last for decades, which makes them the cheapest in the long run. It also may be possible to build your own Edison nickle iron battery at much reduced cost.
What Voltage Battery for Off Grid Solar
The most important thing to consider when sizing your off grid battery bank is the battery bank voltage and the battery capacity.
In most cases, the bank voltage should be the same as your DC power circuit and appliances, typically usually 12 V or 24 V, although 48 V is also an option if intend to use only AC power.
There are many batteries on the market already at 12 V and 48 V, which makes just buying the right voltage battery the most straight forward way to get started.
You also have the option of connecting multiple lower voltage batteries in series (red to black, or + to -) which has the effect of adding the voltages. So you could make a 24 V system with pairs of 12 V batteries. It is also common to find individual lithium (LiFePO4) battery cells for cheap at only 3.4 V each, in which case you would need 4 to make 12 V or 8 to make 24 V. When using series connected batteries, each string must have the same number of batteries, so a 24 V system made of 12 V batteries could have 2, 4, 6 etc, but never 3, 5 etc.
When using series connected lithium batteries, you will also need to purchase a battery management system (BMS) controller. This device hooks up each battery in a string and makes sure they all have the same voltage over time. BMSs are essential for the safety of a lithium battery bank, over or under voltage of lithium batteries can cause fires.
What Size Battery for Off Grid Solar
The storage requirements of you battery bank depends on how you intend to use it. For residential use, the majority of power is used in the morning and the evening (except for hot summer days with the AC running), which means most of the day’s energy will need to come from battery.
I recommend you size you battery bank to store at least a full day’s energy. However, if you live in an area where most winter days are sunny, but there are occasional dark cloudy days, you may want to increase you battery bank to 2 – 3 days worth of power.
Batteries are sized via amp-hours (Ah). To determine how many Ah you need, your maximum daily power consumption and divide it by the battery voltage (not necessarily the bank voltage). Then divide that number by the battery maximum discharge as a decimal:
- Lead Acid — 0.5
- Lithium — 0.8
- Nickle Iron — 1
To make your battery bank last longer, you have the option of decreasing the max discharge by few 10%. The less you discharge your batteries, the longer they last, but the more you need to accomplish the same task.
One you know the total amp-hour rating required, you will want to know how many of a particular battery you would need to by. Battery energy ratings add, so if you needed 1,000 Ah of storage, then you would need 10 each 100 Ah batteries (or 17 each 60 Ah batteries). Just divide the total Ah by the battery Ah to get the number of batteries required, remembering to round up.
Remember, you are series connecting any of your batteries, you have to buy enough batteries to make a full string.
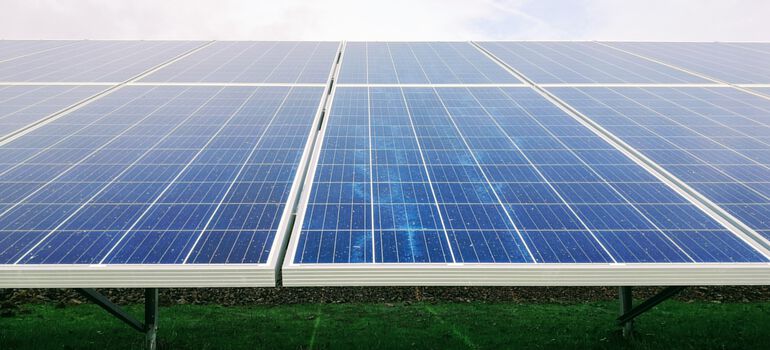
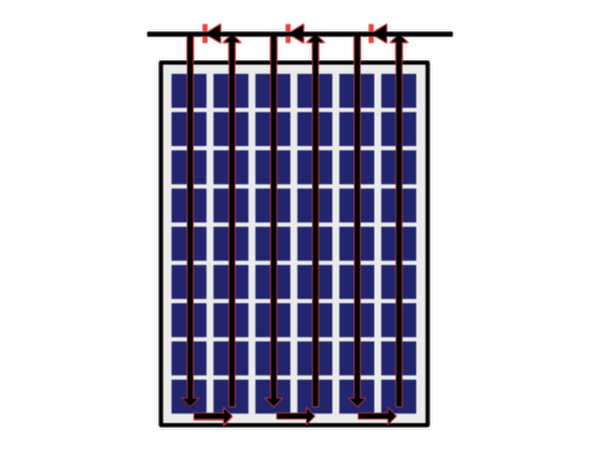
Choosing Off Grid Solar Panels
Solar panels are the engine that drives the your off grid solar electric system. Many beginner off grid solar builders expect them to be the hardest thing to choose, but in reality they can be the easiest of you know what to look for.
How Many Solar Panels Do I Need?
Solar panels are rated in watts (W), which is a measure of their total power output under standard light conditions. About the same level as full sun in a bright sunny day. As you may expect, the amount of energy you actually get depends on how bright it is and how many hours of Sun you actually receive.
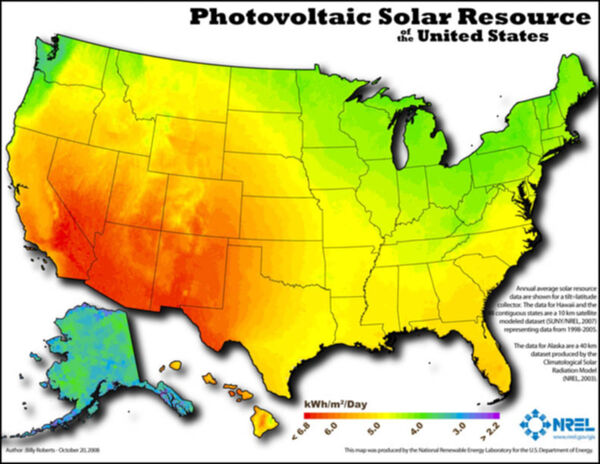
One quick way to estimate the average amount of power that you can produce in your location is with the above map. This shows how much sun you get on average, and gives you a power figure based on the color where you live. Use the key on the bottom right to get an approximate number of solar power availability, then divide how much energy (in kilo-watts) that you need. This will give you a decent base line to determine how many watts of solar panels you need.
Of course, be sure to consider that power use and availability varies throughout the year. So you need to size up your system to account for the leanest times. Read more about this earlier in this article, or in my other articles that covers every step in estimating solar power usage in detail.
Now that you know how many watts total you need, you can shop for solar panels. The number of panels that you need depends on the power rating of the panels, but they should all add up to be as least as much as you need. So, if you need 1 kW (1000 watts) of power in your climate, then you would need 10 total 100 W panels or 3 – 4 total 300 W panels, etc.
Are Bigger Solar Panels Better?
The most important factor when choosing solar panels is the cost per watt. Panels range in size from about 100 W to about 300 W, although there are some very small micro options out there. Based on my research, 100 W solar panels are the most cost efficient on the market.
Additionally, smaller solar panels are a bit easier to handle, and give you more flexibility when choosing the voltage of your system
Mono-crystalline vs Poly-crystalline Solar Panels
Solar panels are usually labeled as one of two types, poly-crystalline or mono-crystalline. This distinction has to do with the type of silicon used in the manufacturing process.
The primary benefit of mono-crystalline panels is that they are smaller in size. You may hear that they produce more power, but in fact an 100 W panel is a 100 W panel no mater which variety you choose. A mono-panel will just need less surface area to produce the same amount of power.
However, poly-crystalline panels are still quite a bit cheaper than mono-crystalline panels. Unless you are very contained for space, ie you are going to cover every square inch of your RV with panels, poly-crystalline solar panel are usually the best choice.
Choosing an Off Grid Inverter
Inverters are the part of the system that converts from DC panel and battery DC voltages to 120 V AC (or 240 V AC outside the US) for use in wall sockets. If you plan on plugging in standard plugs or appliances that are not made for automotive or RV use with DC systems, then you will need an inverter.
The most important factor to consider when choosing an inverter is the total power that it is rated for. This will limit how many appliances that you can plug in at once. For reference, a 2400 W inverter will provide about as much power as a single 20A circuit in your home.
Inverters also come with various rating regarding the quality of the AC wave that it produces. If you plan on plugging in sensitive electronics or some types of motors, then a poor quality sine wave can actually potentially cause damage. Unless you plan on using only purely resist’s loads like light bulbs and heaters, it is best to get a “pure sine wave” inverter.
Wire / Cables, Solar Connectors, and Misc
Often left to last, cables can be one of the most expensive parts of your off grid system.
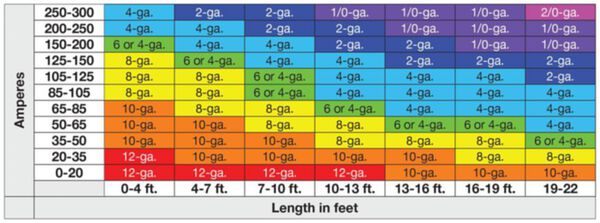
Choosing Solar Wire Thickness (Gauge)
Copper cables are relatively expensive, and sold basically by weight, so the thinner wire you can use the better. The thickness of wire you need is determined by how many amps your circuit will carry. See the above chart.
To determine the number of amps used by a circuit, divide the power in watts by the voltage of that circuit volts.
For example, say we have 1000 W of solar panels, and we need 10 ft of reach from the panels to the charge controller. If this were an 18 V system (common for ‘12 V’ rated panels), we would supply about 55 amps. Since this is a 20 ft run (10 ft each way) we can look on the chart above and determine that we would need at least 4 ga wire.
Lower gauge wire, which is thicker, is always acceptable, but also more expensive.
Now, imagine we decide to run a 72 V system (which is 4 x 18 V panels in series), then we would reduce our current to 14 amps and lower the wire thickness way down to 10 ga. Increasing panel voltage can significantly decrease wire costs.
Solar Rated Wire
Any run of wire that is exposed to the sun needs to have a special rating. All plastics break down in the Sun, and need special additives to withstand the exposure.
On the market, there are many “PV” or “solar” rated wires which are made to handle exposure.
If you decide to go with non-solar rated wires for any external runs, you need to make sure they are covered, painted, or otherwise protected from direct exposure.
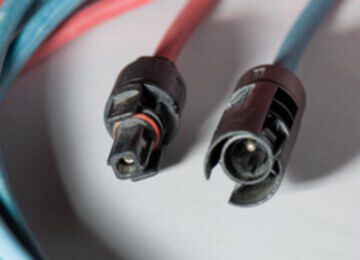
MC4 Connectors
The standard for many solar panel installations, as far as connectors, are MC4 connectors, which are waterproof and an easy means of wiring up your panels. Many panels come with MC4 connectors already installed. For the longer runs between charge controller and the panel array, you have the option of buying pre-made cables, but it is much less expensive to buy the wire yourself and crimp on MC4 connectors you buy yourself.
Battery Management Systems (BMS)
If you are going with a lithium battery bank with multiple batteries in series (connected positive to negative) then for safety you should buy a BMS to manage the batteries. Lithium batteries are potentially dangerous if they go above or below their rated voltage, and a BMS helps ensure that all of the individual batteries in your bank are within spec, which is something that your charge controller can’t do on it’s own.
Other battery types such as lead acid or nickle iron may benefit from a BMS, possibly increasing their lifetime, but you do not absolutely need one for solar systems as they tend to equalize on their own when used in solar systems.
Fuses
Like circuit breakers in a grid connected system, fuses are an essential safety measure in larger off grid solar systems. Fuses disconnect power when too much is drawn from the batteries, potentially causing overheating in the wires or indicating there is a short.
This is a great 12 V – 24 V fuse box that be used for a wide range of systems. Size the fuse inside each circuit to match the amp rating of the wire you used to connect to it. (See chart above)
Under Voltage Disconnect
For the safety and longevity of your battery bank, it is essential that your system cut off power before they are drained too far. Over discharging batteries can kill them almost instantly, and is a fire hazard when using lithium batteries.
Many larger charge controllers come with a battery disconnect feature included. Yours will likely have this if there is a place to wire the load to the charge controller.
Other controllers will not connect directly to the load, and you will have to wire directly to the battery bank. In this case, you absolutely need an external Battery Protector, low voltage cutoff. This Victron is a solid reliable model that can handle up to 100 A circuits.
Other Connections
Most solar electronics such as charge controllers and inverters come with internal binding posts. You just insert a bare wire and strew or clamp down the connection.
For connecting to the batteries, you may need battery terminal clamps or copper bus bars, depending on what style posts your batteries have.
← Go back to Part 1 — Overview, Design, and Sizing
Continue to Part 3 — Solar System Installation →
Related Questions
What is the function of a solar charge controller?
Primarily solar charge controllers prevent solar panels from over charging the battery bank. MPPT charge controllers also adjust solar panel loading to improve efficiency. Some charge controllers also track energy usage, and provide safety cutoffs.
How long do solar panels last?
Solar panels degrade slowly over time, at about 1% per year. Typically, panels are expected to operate for 20+ years before being replaced, although they are usually functional at the time of replacement.