

Once the dread of mother’s Mondays across the world, many people wonder if going off grid means you need to return to the world of the washerwoman’s drudgery. Luckily, there are many modern and classic methods for washing clothes without electricity or even running water that make laundry on the modern homestead a breeze.
How to Washing Clothes Without Electricity. Washing clothes usually happens in four stages: wet, agitate/scrub, rinse, and initial dry. All of these stages can be accomplished by hand with a number of low cost and/or convenient set of laundry washing equipment like buckets, foot powered washers, or old fashioned washboards, and access to clean water. The biggest difference between these methods is the cost and the mechanical method used to agitate the wash.
Below I describe in detail my five favorite methods of washing your clothes, which come a wide variety of costs and convenience. Also, scroll to the bottom the page for a bonus clothes whitening section to help keep your whites exceptionally white.
| Method | Cost | DIY/Build Time | Effort | Load size |
|---|---|---|---|---|
| Bucket + Plunger | ~$10 | 30 min | Medium | Small |
| Hand/Foot Powered Commercial Washing Machines | $100–$350 | 10 min | Medium | Small |
| DIY Bike Washer | Free | 1-2 h | Low | Large |
| Washboard and Wringer | $20–$150 | 15 min | High | Large |
| Foot and Tub | $20–$60 | 15 min | High | Large |
1. Ten Dollar Bucket Washing Machine
By far the cheapest and one of the easiest to get started, knowing this method is practically indispensable as a stop gap in emergency situations. Because of the low it can be particularly helpful when getting stared on a new off grid property, and as a way to fill in when your usual method is not working for some reason. It is a good way to put extra hands to work when you have company or need give children the opportunity to experience what it means to clean their own clothes.
Equipment
- 2ea 5 gallon buckets (or just one in a pinch)
- Plunger
- A length of rope or string (optional but recommended)
- Scrub brush (helpful for tough spots)
- Flat clean surface
Assembly
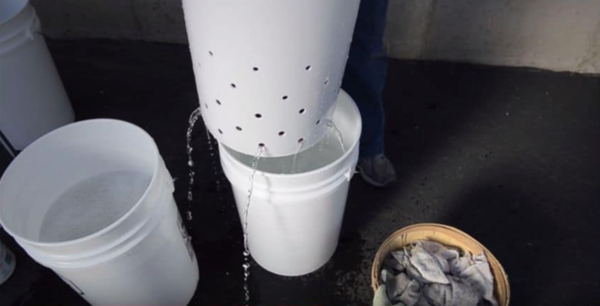
Drill holes about 1/2" in diameter all around and in the bottom of one of the buckets, if you have two buckets. The exact size and number of holes doesn’t matter so long as water can drain easily but the bucket is still strong enough to support the weight of a wet load of laundry. This is your agitation and spin dry bucket.
For agitation, cut a hole in the center of one of the lids just big enough for the plunger handle to fit through.
To get started, place the holey bucket inside the other bucket, fill with laundry, soap, and water. Place the plunger through the top and then close on top of the uppermost bucket.
All together, the initial building shouldn’t take more than about 30 minutes. Holes can be cut with a drill, Dremel, or bit and brace. Or, they can be melted with a bit of red hot iron, such as a length of debar and an open fire.
Method
Step 1. The first step is to put your clothes in a bucket with laundry detergent. Check out my recommended list of plant safe laundry detergents if you aren’t sure which detergents would be safe to use and pour out on the ground.
Step 2. Initially agitate the laundry with a plunger or your hand to make sure all parts of the clothes are completely wet. Then let sit for 10-30 min depending on how dirty the load is and how heavy duty the clothes are, Jeans take longer to completely soak than t-shirts do, for instance. This initial soak time gives the laundry detergents time to do their magic and saves work in the long run.
At this point, you may want to change out the water again depending on how dirty it is. Be aware that colored clothes will almost always have released a surprisingly large amount color in the water by this point. That’s why it’s best to wash similar colors together, and keep very dirty items like work clothes away from nicer and cleaner clothes.
Step 3. Also, take the time to check for any stains or particularly dirty patches on the clothes that don’t seem to be working their way out. A quick manual scrub with a direct application of detergent on the tough spot at this point can save quite a bit of work later and makes it easier to get clothes really clean.
Step 4. Now, use the plunger to vigorously agitate the clothes, making sure to get the edges in play, working the items of clothes against each other. It usually takes me 15-30 min of work to get things nice and clean. Very dirty loads may benefit from an additional change of water as well.
Step 5. Finally, drain the wash water and fill the bucket with fresh clean water without detergent. Rinse by agitating for about 5 min more take out the clothes. You can do this by pulling out the inner bucket, potentially using the remaining water the start of the next load.
To assist drying, you have the option of spinning the clothes to assist drying using the strainer bucket by tying the handle to a tree limb or strong overhead support outside. Spin the bucket on the rope twisting it up as much as you can, then let it untwist itself, rapidly spin drying the clothes.
Pros and Cons
The bucket method is cheap and easy to get started. Many offgridders may already have an extra bucket or two around, or can get some for free from restaurants or from builders in the area. And, for DIY methods it is by far the easiest. Great to have around as a backup method if nothing else.
For full time usage, the small load size could make doing laundry for a family a bit of headache, but is probably sufficient for singles our couples. Probably best done outdoors. Looks a little hillbilly. More work than foot powered options.
2. Commercial Hand or Foot Powered Portable Washing Machines
If DIY isn’t your speed, then there are several commercial off grid washing machines that you can buy online through places like Amazon. Check out our off grid washing machine recommendation pages
Equipment
Commercial hand spun washing machines are readily available online and can be delivered directly to your door. You won’t need any additional equipment except the usual water and laundry detergent.
Check out my recommended list of plant safe laundry detergents if you are in the market for something more natural.
Assembly
Often no or only minor assembly required. Follow the directions that came with your washer.
Method
Washing method is similar to with the bucket method above:
- Add clothes, soap, and water
- Let soak for 10 – 30 min
- Spin handle for 15 – 30 min
- If water is very dirty, change out with more soap and water
- Hand scrub / touch up particularly dirty spots if necessary
- Rinse with clean water and spin handle for about 5 min
- Drain water
- Spin as fast as possible to wring out
Pros and Cons
The biggest pro this method is that it is quick and easy to set up. There is very little mess involved when using these commercial washers, and they are suitable for use indoors, which is great in the winter. Further, these machines are very compact, so they store easily and are great for tiny homes or off grid cabins where space is a premium.
Easily the most expensive option on the list, these washers are also the smallest taking a load sum what less than a 5 gallon bucket.
3. Washing Machine Bike
Probably the ultimate DIY option. Riding a bike to power your laundry allows you to do larger loads while reading a book, listening to music, or watching a movie. Stay clean and get fit at the same time. Also a great energy outlet for kids.
Equipment
- An old bike or stationary bike
- An old washing machine
- Large belt, bike chain, or old bike tire
- Wood or metal supports for mounting
###How to Build a DIY Bike Washing Machine
This is a very DIY option, so it is hard write down a step by step guide since some of the steps depend on exactly the materials that you have on hand. This build is very free form, and can be tailored too meet your particular skills.
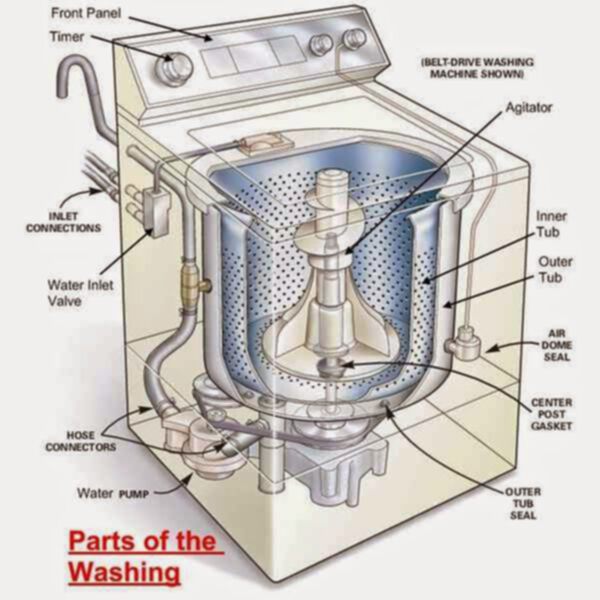
Connecting the Bike to the Washer. The most critical part of the build is connecting the bike’s drive to the washing machine. Most washing machines have a belt drive between the electric motor and the washing machines agitator or drum. The best way to connect the bike to the machine is to remove the electric motor, but out or remove the side of the machine, and run a longer rubber belt from the driven pulley directly to the back wheel of the bike.
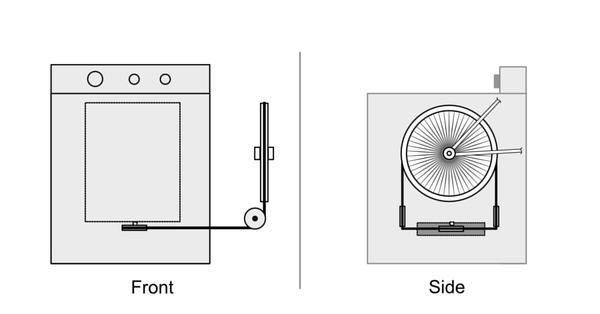
If you have a side load washing machine, then the connection is probably straight foreword. However, top loaders typically have their pulley oriented flat, which required a 90 degree turn from the driving belt. There are a number of ways to accomplish this, but my recommendation is shown in the diagram below. This utilizes two additional pulleys to route the belt around, and they can be used to help adjust the tension on the best as well.
Some washing machines don’t have any pulley at all. Rather the motor uses a rubber where and friction to drive the wash barrel directly. In this case you can wrap your rubber belt all the way around the drum in order to drive it.
Making a Long Belt
It can be hard to find a large rubber belt on the cheap. Depending on what you have available the best option could be a used bike tire. You can make a long belt from the tire by slicing it along its length. Start next to the stem and slice along the tire length, slowing spiraling around the tire as you go.
By the time you get all the way around, you should be on the other side of the tube from where you started, having gone half way around the tube. Continue slicing around the tube one more time, spiraling slightly so that you go half way around again to meet where you started the cut initially at the stem.
Finish your cut and cut off the stem as well.
Now you have a single long rubber belt twice the length of the original tire that works great in this project. You could also adapt this method to get a belt 3 or 4 times longer that the original tire, but I’ll leave that to your imagination.
Plumbing
Washers typically have one or two electrical valves to control the in flow of hot and cold water, as well as a pump to drain the water.
The simplest way to go is to ignore the inlets, and bypass the pump entirely. Simply cut the drain pipe before the pump, install a manual value, and route to your drain or grey water system. This means filling the tub with water can be accomplished with hoses, boiled water from kettles, or buckets as appropriate.
If you would like to plum the water inlets, then you will need to bypass the inlet valves. The easiest way is to get a new segment of pipe and possibly a Y-connector to run the incoming water directly to the spout on the top of the washer. This would allow you to use the manual water values typically used for washer installation to control water inflow and temperature.
Mounting the Bike
I recommend semi-permanently mounting the bike and washer together, to avoid them moving apart and maligning the belt during use. Those with welding skills could fabricate a metal frame which holds the bike directly to the washing machine, making them one piece.
The simplest way in my book is to screw two 2x4s to the bottom of the washer, sticking past it 3’ on the side the bike will be one. If you already have a stationary bike, then screw it down to the wood with some pipe mounting hardware and call it a day.
For recycled mountain or road bikes, I would first remove the front wheel and bolt a piece of wood between the in the forks where the wheel was. Then screw or bolt the wood to a post cut the right size, mounted on the 2x4s with appropriate braces to keep everything stable.
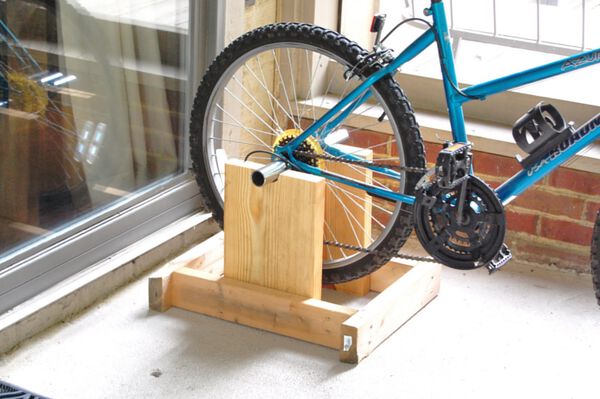
To keep the back wheel mounted, a popular method (shown above) is to build a small wooden from that supports two bike pegs, which replace the rear wheel bolts. Of course, welding skills removes the need to buy pegs, as you could weld on a similar support.
Method
Washing method is similar to how a normal washing machine works
- Add clothes, soap, and water
- Let soak for 10 – 30 min
- Ride bike for 15 – 30 min
- Drain and add clean water
- Ride bike for 15 – 30 min
- Drain water
- Spin as fast as possible to wring out
Pros and Cons
Probably the easiest to use and one of the highest capacity options for electricity free washing. Works basically just like a standard home washing machine, except you power it yourself. You get to sit while powering the washer which means you can read a book or watch TV, just like if you went to the gym, except you get clean clothes at the end instead of a bill.
The most difficult option to build on this page, but not a particularly involved for DIY minded offgridders. Requires quite a bit of storage space and may not be particularly attractive to look at (depending on your fabrication skills)
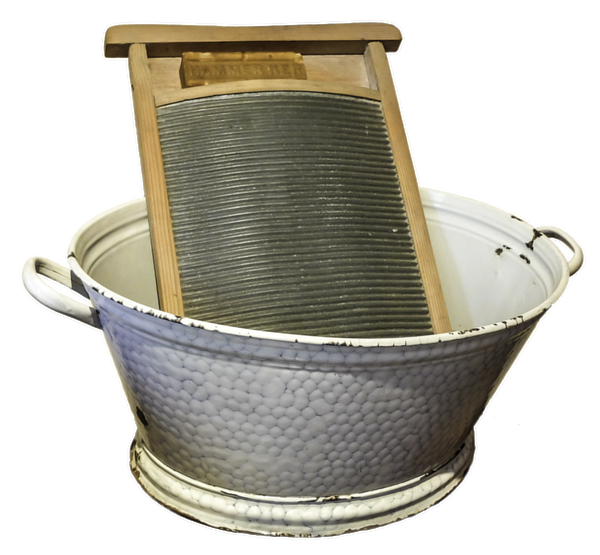
4. Grandma’s Washboard and Wringer
A blast from the past, washboards, wringers, and tubs are both effective, low cost, and space efficient. Striking a balance between the low cost and little if any equipment, learning to wash clothes the way your grandparents or great grand parents learned to do it is still a valid choice for the off grid home maker.
Equipment
- Washboard
- Laundry tub or galvanized basin
- Wringer
Assembly
No assembly unless you need to mount your wringer on the basin.
Method
Unlike other methods where you agitate whole buckets of clothes at a time, using their friction against each other to clean the clothes, the wash board is used individually on each garment. Start by soaking the clothes in warm water and soap. As usually I recommend 10 – 30 min soak depending on how dirty they are and how thick the fabric is.
Once soaked, take each item of clothing out of the basin individually and scrub it back and forth on the wash board until clean. Most people choose to put their board half way in the tub, angled up along the side in front of you. This way you can dunk the garment in and out of the wash water as you scrub to assist with cleaning.
A scrub brush can also help with stubborn stains that the scrub board can’t handle.
If you don’t have a wringer, you can always do it by hand, although they are relatively cheap and new clean mop wringers are cheap and easy to find. And they work well for clothes as well as mops.
A clean garment is best wrung out to get any residual soap out, then rinsed either in a second bucket, or set aside and rinsed in the main bucket when all the washing is done.
Finally, wring out your clean and rinsed garment and dry.
Pros and Cons
Probably the deepest, best clean on the list. A properly done old fashioned wash produces strikingly clean garments, which may be even better than modern washing machines can do. This method is cheap to get started with, and with large tubs can process lots of laundry in one go.
The biggest downside to this method is the amount of elbow grease required, and the prune fingers that develop.
5. Wash Tub and Foot Power
Taking an inspiration from the ladies of European wine country, a profoundly low tech you high volume clothes washing method is to use a large wash basin, bath tub, even a trap in a hole and your feet to wash clothes. If you need to get a lot of clothes done fast, especially very clean clothes or dirty work clothes that don’t need to be scrubbed to perfection.
Equipment
- One or more of the following:
- Large wash basin
- Bath tub
- Tarp and shallow hole in the ground
- Wringer (optional)
Assembly
None. If using tarp method, dig hole or pit if necessary, and place the tarp in the hole so that it will retain water.
Method
The primary difference between this method and the others is that you will use you feet to agitate the clothes by directly walking in the wash basin. Think of the women who crush grapes by walking on them. To get started, take off your shoes and socks and roll up your pant legs. Make sure you have something near by that you can use for support and be careful not to slip and fall while in the wash water.
- Add clothes, soap, and water
- Let soak for 10 – 30 min
- Walk over clothes for 15 min – 1 hour (larger basins need more time or people)
- Drain and add clean water
- Walk over clothes again for 15 min – 1 hour
- Drain water
- Wring out by hand or with wringer
Pros and Cons
Very cheap and great for high volume clothes. Could be the go to method for large bulky items like comforters and sleeping bags.
Probably not the best result of all the options. You spend a lot of time with your feet in water.
Related Questions
How do you wash clothes if you don’t have a washing machine?
Using soap, water, and a bucket or tub is a good start. Washboards and brushes can be used to help clean tough spots. Soak, scrub, wring, rinse, wring, then dry is the basic process.
How do you wash clothes without electricity?
An old fashioned wringer and scrub board works well. Low cost options include a (new) plunger and bucket, large wash basin, or a DIY bike powered washing machine. Small hand or foot cranked portable washing machines are also available online.
How do you wash clothes with a washboard?
Start by soaking your clothes in detergent and water. Then, scrub your clothes individually against the washboard until they are clean. Wring and rinse the clothes in clean water. Then wring again and dry.